Pizza Pot Pie - This Pizza Pot Pie eats like your favorite slice turned into a spoonable, cheesy baked dinner with a flaky, crisp top that shatters into buttery layers. Under the crust, the filling stays thick and saucy with stretchy mozzarella, savory pepperoni, and a rich tomato base that balances tangy and slightly sweet. Each scoop pulls up gooey pockets and browned edges that feel nostalgic and indulgent without being complicated. It is a family dinner idea that can be prepped ahead, baked hands-off, and served straight from the dish for a satisfying weekend comfort food dinner.
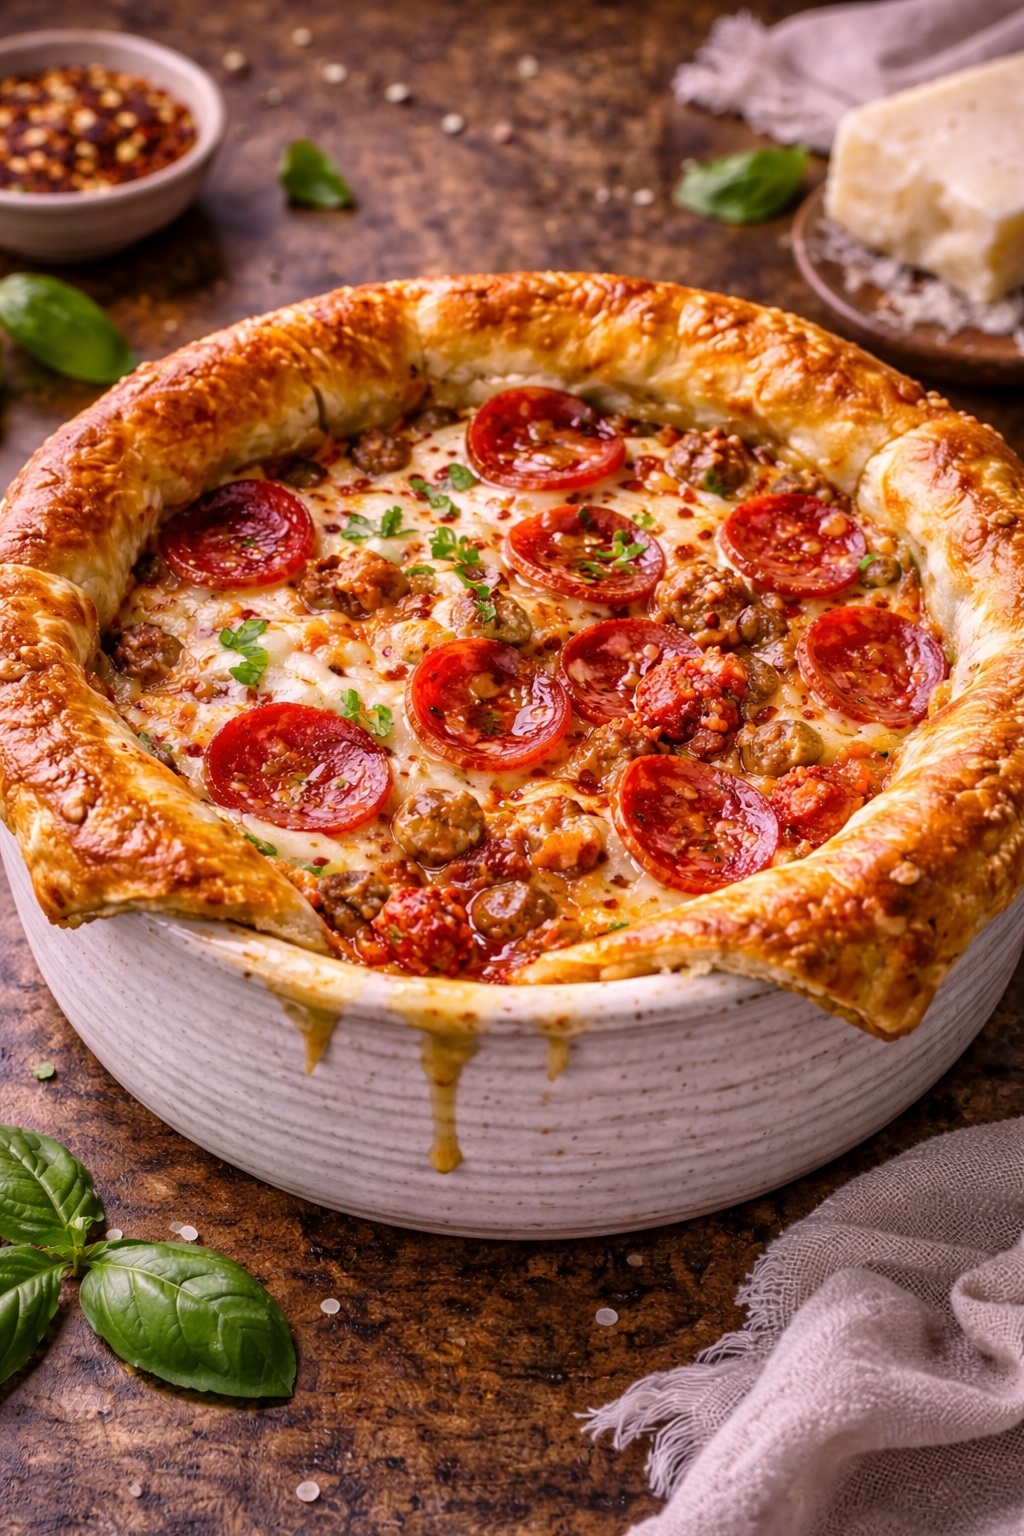
Pizza Pot Pie - This recipe works because it treats pizza filling like a pot pie gravy: the sauce gets reduced and tightened before it ever goes in the oven, so it bakes up thick instead of watery. After testing a looser “pizza sauce + toppings” approach, I kept getting a soupy bottom that steamed the crust from underneath; the fix was simple technique over complexity—simmer the tomatoes with tomato paste until a spoon leaves a clean trail, then fold in the cheese so it melts into the sauce and emulsify the fat into a glossy, clingy base. Browning the sausage (or any meat) first builds flavor through caramelize notes, and deglaze the pan with a small splash of water to pull up the browned bits so the sauce tastes deeper without extra ingredients. I also found that adding pepperoni in two moments—some in the simmering filling for seasoning and some tucked near the top for crisp edges—creates the most “pizza shop” punch. This shows how basic ingredients create something special: a cozy comfort food dinner that looks impressive, slices like a pie, and still feels like pizza when you take the first bite. The method is straightforward but delivers professional results because you control moisture, layer textures, and bake hot enough to keep the crust crisp while the center stays gooey and tender.
Dietary Notes
- ✓ Family Dinner Comfort
- ✓ One-Dish Bake
- ✓ Make-Ahead Friendly
- ✓ Cheesy, Crispy Top
♥
Why You'll Love This
- Flaky Pizza Twist: A crisp, buttery crust bakes over a thick pizza-style filling for a pot pie scoop that still tastes like pizza night.
- Reliable Texture: Reducing the sauce first guarantees a thick, saucy center that will not turn watery or soggy.
- Crowd-Pleasing Flavor: Savory meat, tangy tomato, and stretchy mozzarella hit that nostalgic, indulgent comfort-food dinner craving.
- Flexible Fillings: Swap meats, add veggies, or change cheeses to match what you have without changing the core method.
Pizza Pot Pie
👩🍳 Author: Abderrahmane
⏰ Prep Time: 25min
❄️ Cool Time: 10
🔥 Cook Time: 35min
🥨 Yield: 6
🍞 Method: Baking
🌾 Diet: None
★
★
★
★
★
Leave a review
1x
2x
3x
Ingredients
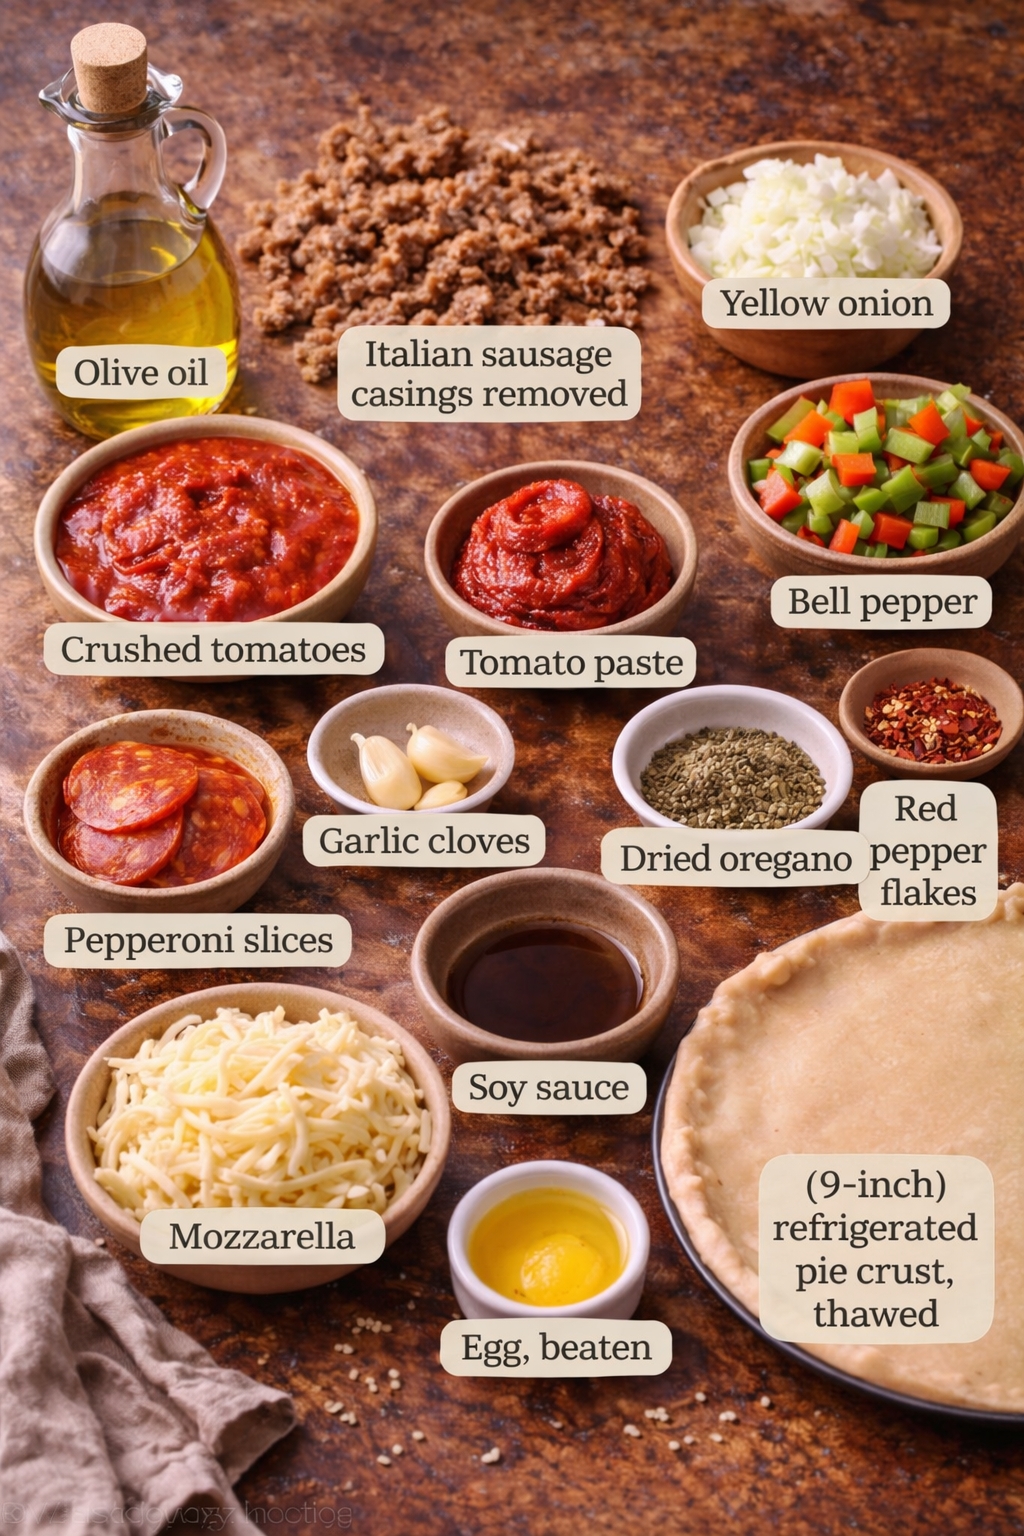
- 1 tbsp olive oil
- 12 oz Italian sausage, casings removed
- 1 medium yellow onion, diced
- 1 bell pepper, diced
- 3 garlic cloves, minced
- 1 (28 oz) can crushed tomatoes
- 2 tbsp tomato paste
- 1 tsp dried oregano
- 1/4 tsp red pepper flakes
- 3 oz pepperoni slices
- 2 cups mozzarella, shredded (low-moisture)
- 1 (9-inch) round refrigerated pie crust, thawed if frozen
- 1 egg, beaten
Ingredient Notes:
- olive oil Use a neutral olive oil that can handle a quick sear; hot oil helps caramelize the sausage bits, building flavor fast while keeping the filling glossy instead of greasy.
- Italian sausage, casings removed Brown it hard so you get crisp edges and fond; that caramelize depth makes the sauce taste restaurant-style, and draining excess fat prevents a heavy, separated filling.
- yellow onion, diced Dice evenly so it softens at the same rate; cooking until tender drives off moisture, which keeps the pot pie center thick and prevents a watery, soggy crust.
- bell pepper, diced Choose a firm pepper for a tender bite that does not collapse; sautéing first concentrates sweetness and helps the filling stay balanced, not acidic.
- garlic cloves, minced Add garlic after the vegetables soften and cook briefly; over-browning can turn it bitter, while a short sauté builds flavor without harshness.
- crushed tomatoes Pick a good-quality can for a richer tomato backbone; simmer until it thickens so the filling bubbles creamy and clingy rather than thin and soupy.
- tomato paste Cook it into the tomatoes to tighten the sauce and deepen color; this small step helps emulsify the fat and prevents a watery layer under the crust.
- dried oregano Rub oregano between your fingers before adding so it blooms; the aroma reads “pizza” instantly and supports a savory, balanced comfort food dinner.
- red pepper flakes A small pinch sharpens the flavor and cuts richness; it is an easy fix if the filling tastes flat, without making the dish overly spicy.
- pepperoni slices Split the pepperoni: simmer some to season the sauce, then layer the rest near the top so it crisps as it bakes, adding chewy and crisp texture contrast.
- mozzarella, shredded (low-moisture) Low-moisture mozzarella melts gooey without watering out; fold it in off heat so it melts smoothly and keeps the sauce velvety instead of stringy and separated.
- refrigerated pie crust, thawed if frozen Keep the crust cold until you top the dish; cold fat creates steam pockets that bake flaky and crisp, and cutting vents releases steam so it does not turn gummy.
- egg, beaten Brush a thin, even coat for a golden finish; egg wash helps the top bake crisp and glossy, which keeps the pot pie look clean and photo-ready.
Instructions
-
1Step 1: Preheat the oven to 425°F and set a baking dish on a sheet pan until hot - starting hot helps the filling bubble fast and keeps the bottom from steaming the crust.
-
2Step 2: Sear the sausage in olive oil over medium-high heat, breaking it into small pieces, until browned with crisp edges - browning caramelize notes builds a deeper, pizza-shop flavor.
-
3Step 3: Add onion and bell pepper and cook 5–7 minutes until softened and lightly golden - this drives off water so the filling stays thick and the crust stays crisp.
-
4Step 4: Stir in the garlic for 30–45 seconds until fragrant - quick cooking prevents bitterness while still building flavor.
-
5Step 5: Add crushed tomatoes, tomato paste, oregano, and red pepper flakes, then simmer 8–10 minutes until a spoon leaves a clean trail - reducing now guarantees the filling will not turn watery in the oven.
-
6Step 6: Fold in half the pepperoni and 1 1/2 cups mozzarella until melted and glossy - the cheese helps emulsify the sauce so it clings and stays gooey instead of separating.
-
7Step 7: Pour the thick filling into the hot baking dish and scatter the remaining mozzarella and pepperoni on top - this creates browned, crisp edges and keeps the center tender.
-
8Step 8: Lay the pie crust over the dish, crimp the edges, cut 4–5 vents, and brush with beaten egg - vents release steam so the crust bakes flaky and the egg wash makes it golden.
-
9Step 9: Bake 30–35 minutes until the crust is deeply golden and the filling bubbles through the vents, then rest 10 minutes - resting sets the sauce so each scoop holds together.
Nutrition Facts
Calories 520
Protein 24g
Carbs 32g
Fiber 4g
Sugar 7g
Fat 34g
Sodium 980mg
Potassium N/A
Serving Suggestions
Serve this hot from the oven after a short rest so the filling sets and the crust stays crisp when you cut or scoop. For the cleanest presentation, lift off a few big shards of crust first, then spoon the saucy filling into bowls and place crust pieces on top so the flaky layers stay crunchy. Pair with a bright side like a simple arugula salad with lemon and olive oil, or roasted broccoli for a weeknight dinner balance. Finish with a pinch of grated Parmesan and a few basil leaves right before serving, and aim to serve while the cheese is still gooey and stretchy for the most satisfying texture.
How to Store?
Cool leftovers completely, then cover and refrigerate for up to 4 days. Reheat portions in a 350°F oven until the center is bubbling and the crust feels crisp again; a microwave will warm it fast but can soften the crust, so use the oven when you want the flaky top back. This freezes well: wrap cooled portions tightly and freeze up to 2 months, then thaw overnight in the fridge and reheat in the oven. For make-ahead, cook and reduce the filling up to 2 days early, chill it, then top with the crust and bake fresh so the crust bakes crisp instead of absorbing moisture while it sits.
If you enjoyed this Pizza Pot Pie or any other recipe on my blog,
please leave a ⭐ star rating and let me know how it went
in the comments below. I appreciate you taking time to read about this recipe, thank you!


Leave a Comment