Crispy and Cheesy Kunafa - This crispy and cheesy kunafa recipe is the kind of dessert that immediately gets attention because it delivers everything people want from a high-impact Middle Eastern sweet: a deeply golden crunchy top, a rich buttery base, a soft stretchy cheese center, and glossy sugar syrup that soaks in just enough to make every bite rich without turning soggy. The texture is the true star here. The fine shredded pastry bakes into delicate crisp layers that crackle lightly under the fork, while the warm cheese filling stays smooth, molten, and satisfyingly gooey in the middle. That contrast between crunchy pastry and creamy cheese is what makes kunafa one of the most talked-about Arabic dessert recipes online and one of the most memorable sweets on any dessert table. The flavor is equally strong. Butter gives the pastry a toasted richness, the cheese adds a mild milky depth, and the syrup finishes everything with floral citrus notes that make the dessert taste luxurious instead of flatly sweet. This is exactly the kind of recipe people search for when they want authentic kunafa, cheesy kunafa, crispy kunafa, homemade kunafa, or the best kunafa recipe for gatherings, Ramadan, holidays, or viral dessert content. It looks impressive, slices beautifully, and tastes like something from a professional pastry shop while still being completely achievable in a home kitchen.
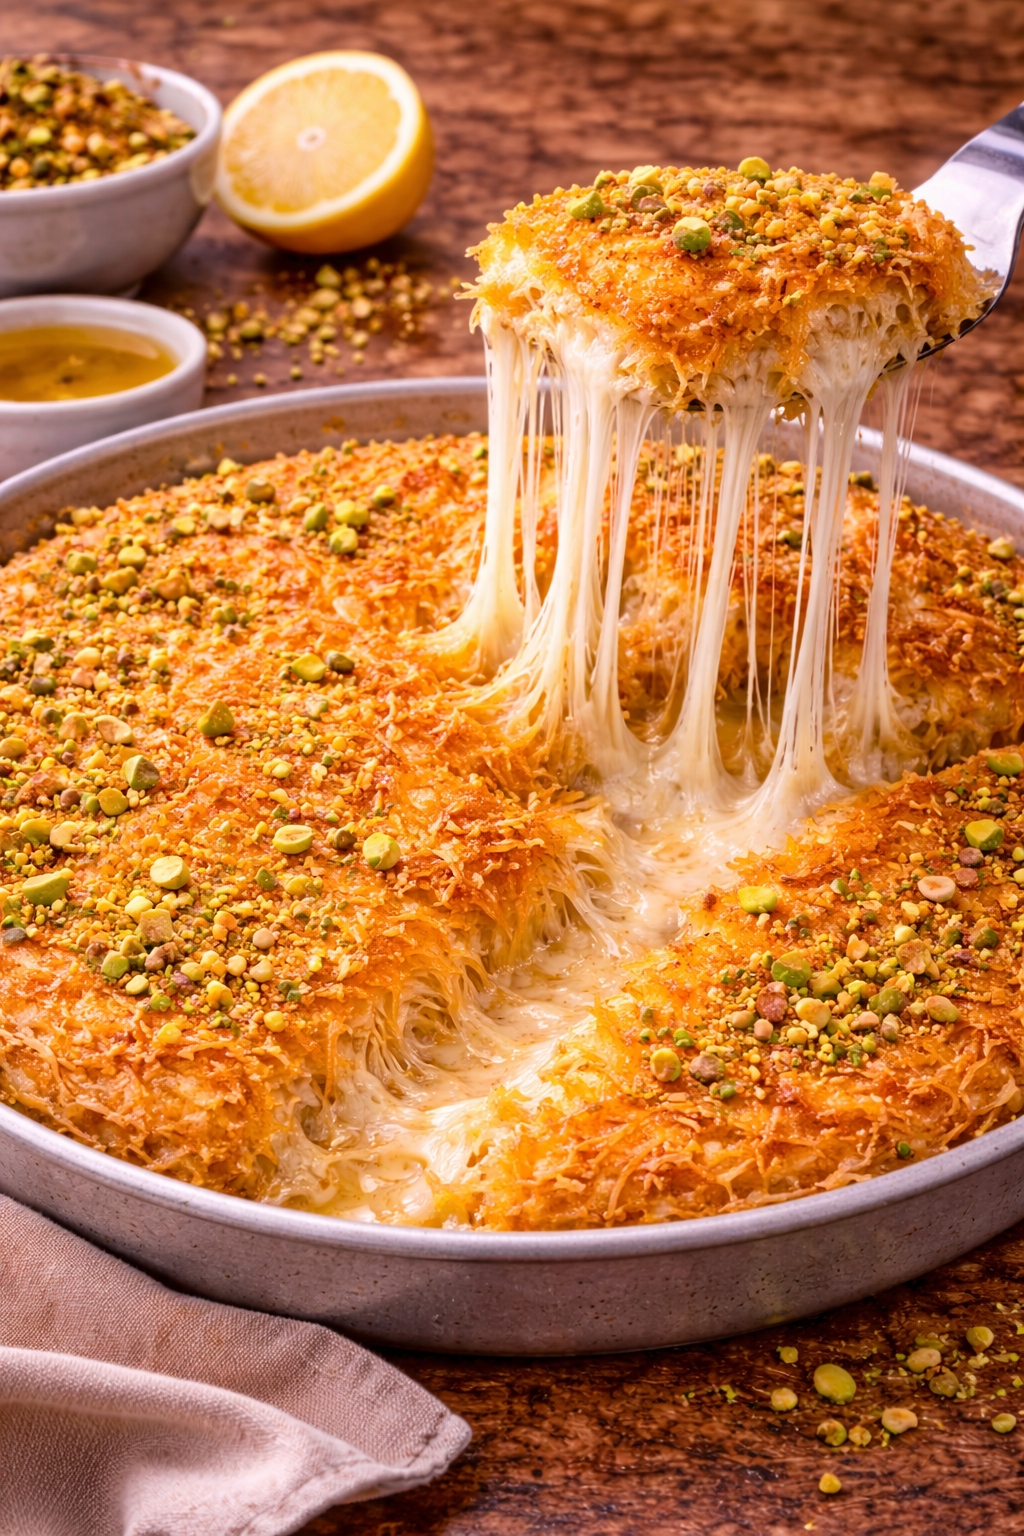
Crispy and Cheesy Kunafa - This recipe works because every part of the process is built around protecting texture, which is the difference between average kunafa and truly great kunafa. The kataifi pastry needs to be separated thoroughly before butter is added so the strands bake individually and evenly rather than clumping into dense patches. Melted butter has to coat the pastry well enough to encourage browning and crispness but not so heavily that the dessert becomes greasy. After testing different methods, I found that pressing the bottom layer firmly into the pan helps create a stable crisp base, but the top layer should be packed more gently so it keeps some airy texture and browns more attractively. The cheese choice matters just as much. A mild stretchy cheese gives the dessert its classic pull and creamy center without competing with the syrup. If the cheese is too salty or too sharp, the balance is lost. If it releases too much water, the pastry softens before the top has time to crisp. That is why a low-salt mozzarella or traditional kunafa cheese, sometimes blended with a little ricotta for softness, works so well in a home version. The syrup is another critical detail. It should be cooked ahead so it is fully dissolved and lightly thickened, then cooled slightly before the hot kunafa comes out of the oven. Pouring warm or room-temperature syrup over hot pastry creates the glossy finish and gentle absorption people want in an authentic crispy kunafa recipe. Too much syrup will flood the crust. Too little will leave the interior dry and the sweetness disconnected. This recipe uses enough to sweeten and perfume the pastry while still preserving the prized crunchy edges. The floral note from orange blossom water or rose water gives the dessert its classic Middle Eastern identity, while a little lemon juice keeps the syrup clean and prevents it from tasting heavy. This shows how a simple ingredient list becomes something special when the technique is handled properly. The method is straightforward but delivers professional results, which aligns with my focus on technique over complexity. Resting the kunafa for a few minutes after baking also matters because it helps the cheese settle just enough for cleaner serving while still staying stretchy and hot. Garnishing with crushed pistachios adds color and a final nutty crunch that makes the finished dessert look even more luxurious and click-worthy. The final result is everything people want from a crispy cheesy kunafa recipe: golden color, crisp shredded pastry, gooey cheese pull, fragrant syrup, and a dramatic presentation that performs beautifully for guests, celebrations, bakery-style dessert spreads, and high-engagement food content. It is comforting, indulgent, highly shareable, and one of the strongest dessert recipes for anyone looking for a sweet that feels both authentic and unforgettable.
Dietary Notes
- ✓ Middle Eastern Dessert Favorite
- ✓ Crispy Pastry Texture
- ✓ Crowd-Pleasing Celebration Sweet
- ✓ Bakery-Style Homemade Treat
♥
Why You'll Love This
- Signature Crunch: The butter-coated kataifi bakes into a deeply golden crust that stays crisp around the soft cheese center.
- Classic Cheese Pull: Mild stretchy cheese gives the dessert the gooey, melty middle people expect from a true kunafa recipe.
- Balanced Sweetness: Floral syrup finishes the pastry without drowning it, so the texture stays rich but never soggy.
- High Visual Impact: Pistachio garnish, glossy syrup, and dramatic layering make this one of the most eye-catching dessert recipes for gatherings and viral content.
Crispy and Cheesy Kunafa
👩🍳 Author: Abderrahmane
⏰ Prep Time: 25min
❄️ Cool Time: 10
🔥 Cook Time: 35min
🥨 Yield: 8
🍞 Method: Baking
🌾 Diet: Vegetarian
★
★
★
★
★
Leave a review
1x
2x
3x
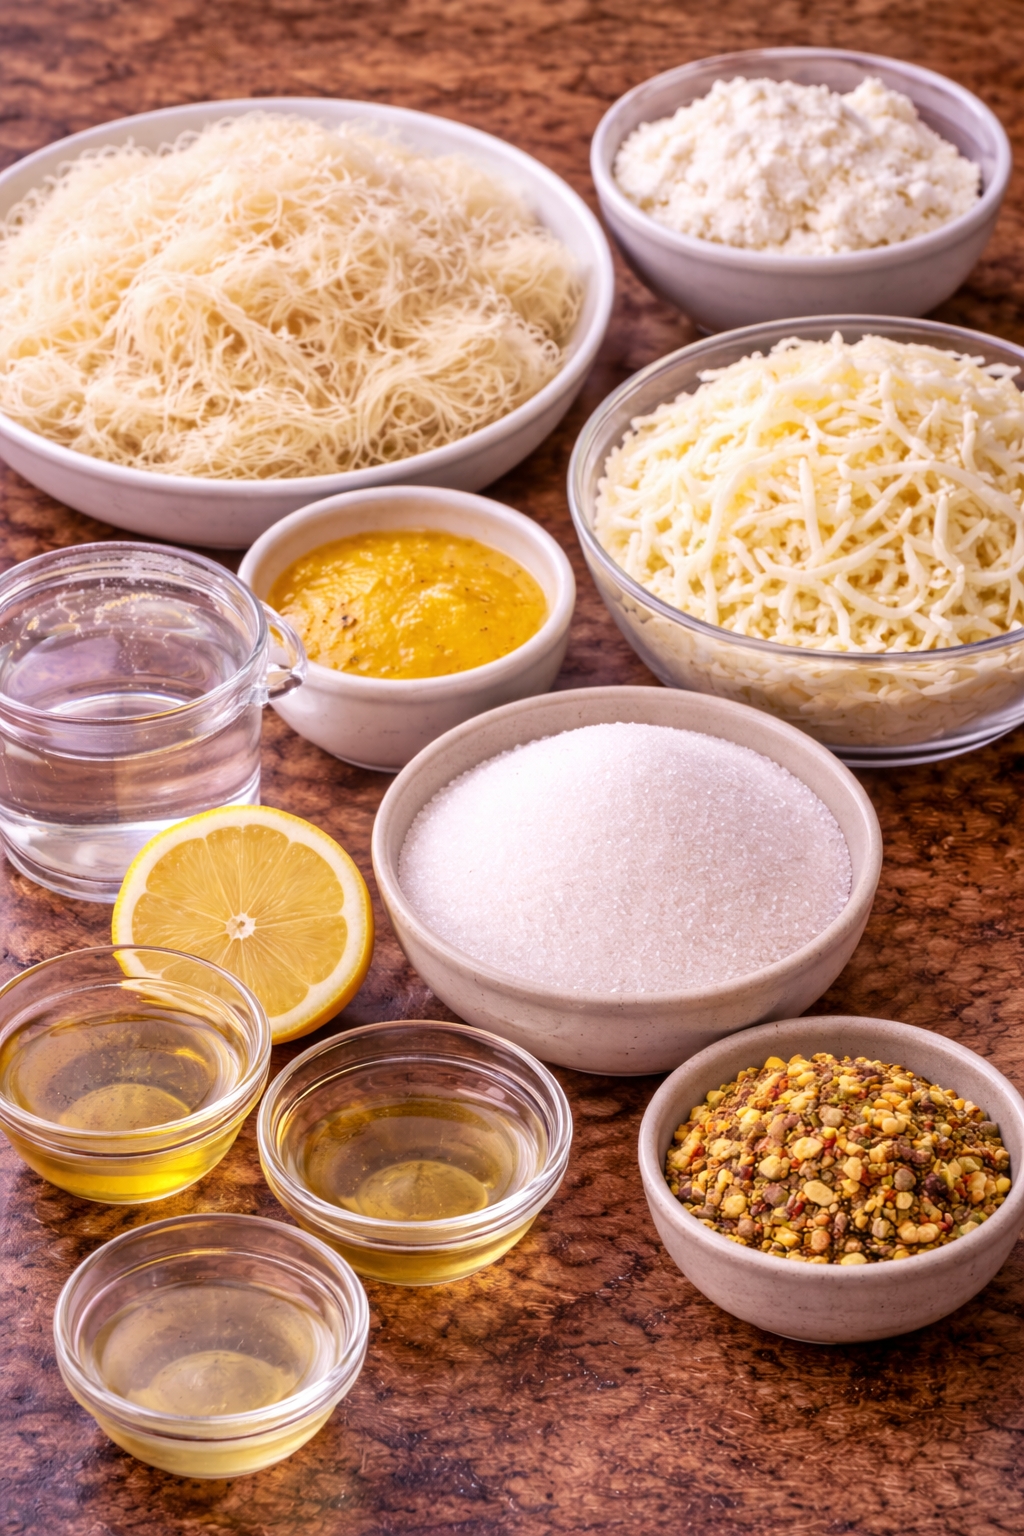
Ingredients
- 500 g kataifi dough, thawed and separated
- 200 g unsalted butter, melted
- 400 g low-moisture mozzarella or kunafa cheese, shredded
- 150 g ricotta cheese
- 1 1/2 cups granulated sugar
- 3/4 cup water
- 1 tsp lemon juice
- 1 tsp orange blossom water or rose water
- 1/3 cup crushed pistachios
Ingredient Notes:
- kataifi dough, thawed and separated Kataifi is the heart of a crispy kunafa recipe because its fine strands create the delicate crunchy texture that makes the dessert so distinctive. Separate it patiently before adding butter so the pastry bakes evenly and develops those light, golden, feathery layers instead of compact dry areas.
- unsalted butter, melted Butter gives the pastry its rich flavor and deep golden finish, but it has to be distributed evenly rather than poured in heavy spots. The goal is crisp buttery strands, not oily pastry, so toss thoroughly until everything is lightly coated and glossy.
- low-moisture mozzarella or kunafa cheese, shredded A mild stretchy cheese is what creates the classic gooey, melty middle people expect from authentic cheesy kunafa. Low-moisture cheese works especially well in home kitchens because it melts smoothly without releasing too much liquid that could soften the pastry.
- ricotta cheese Ricotta is optional, but a small amount can soften the filling and make the center feel creamier and more luxurious. Use it carefully, since too much can reduce the stretchy cheese pull and make the middle overly soft.
- granulated sugar Sugar forms the base of the syrup, which should sweeten and perfume the pastry rather than overwhelm it. The best kunafa syrup tastes clean and glossy, not thick like candy, so proper ratio and brief simmering matter.
- water Water dissolves the sugar and creates the syrup consistency that allows controlled absorption into the pastry. Too little can make the syrup overly sticky, while too much can leave it thin and less effective at coating the hot dessert.
- lemon juice A small amount of lemon juice sharpens the syrup and helps prevent crystallization, keeping the finish smooth and polished. It also cuts through the richness of the butter and cheese so the dessert feels balanced rather than cloying.
- orange blossom water or rose water This is what gives homemade kunafa its unmistakable Middle Eastern bakery-style aroma. Use it lightly so it perfumes the syrup with floral citrus notes without making the dessert taste overly perfumed or soapy.
- crushed pistachios Pistachios add color, crunch, and a final nutty finish that makes the dessert look more festive and complete. Scatter them over the top just before serving so they stay vivid and give the warm syrupy pastry a little contrast.
Instructions
-
1Step 1: Prepare the syrup by simmering the sugar and water until completely dissolved and lightly thickened, then stir in the lemon juice and orange blossom water and set aside to cool slightly - this creates the glossy fragrant syrup that sweetens the kunafa without making it heavy or grainy.
-
2Step 2: Pull apart the kataifi strands with your hands until fluffy, then toss them thoroughly with the melted butter until every strand looks lightly coated - this guarantees the pastry bakes into fine crisp layers instead of dry clumps or greasy patches.
-
3Step 3: Press half of the buttered kataifi firmly into a buttered baking pan, spreading it into an even layer with well-defined edges - this forms the stable crisp base that supports the cheese and helps the dessert hold together when sliced.
-
4Step 4: Scatter the mozzarella or kunafa cheese evenly over the bottom layer and dot with ricotta if using, keeping the filling away from the very edges - this creates the signature gooey center while helping prevent melted cheese from leaking and burning against the pan.
-
5Step 5: Cover the filling with the remaining kataifi and press gently until the top is even but not too compacted - this allows the upper layer to brown attractively and stay crisp rather than baking into a dense lid.
-
6Step 6: Bake the kunafa until the pastry is deeply golden and crisp and the cheese is fully melted in the middle - this high-contrast finish is what makes a homemade kunafa recipe truly satisfying and visually striking.
-
7Step 7: Pour the syrup over the hot kunafa as soon as it comes out of the oven, letting it absorb gradually before topping with pistachios - this timing keeps the pastry flavorful and glossy while protecting the crunchy crust from becoming soggy.
-
8Step 8: Rest for a few minutes before slicing and serving warm - this short pause helps the layers settle just enough for cleaner portions while keeping the center molten and stretchy.
Nutrition Facts
Calories 540
Protein 14g
Carbs 47g
Fiber 1g
Sugar 28g
Fat 33g
Sodium 410mg
Potassium N/A
Serving Suggestions
Serve kunafa warm, ideally within minutes of baking, so the cheese remains soft and stretchy and the pastry stays at peak crispness. For the best presentation, invert or slice it cleanly onto a shallow serving platter, then spoon a little extra syrup over the top only if needed rather than saturating the whole dessert again. Finish with a generous scattering of crushed pistachios so the green color contrasts with the deep golden pastry, and add a light dusting of dried rose petals only if you want a more decorative finish. This dessert pairs beautifully with strong coffee, mint tea, or unsweetened tea because the bitterness of the drink balances the buttery sweetness of the kunafa. If serving for a holiday or dinner party, cut the pieces while the pastry is still hot but let them sit for a minute on the plate so the cheese settles slightly and the layers remain easy to eat. Kunafa is best enjoyed fresh and warm, when the top is crisp, the center is molten, and the syrup is fully fragrant.
How to Store?
Store leftover kunafa covered in the refrigerator for up to 3 days. The texture is best on the day it is baked, but it reheats surprisingly well in a moderate oven, which helps restore much of the pastry’s crispness while warming the cheese filling again. Avoid microwaving if possible because it softens the pastry too quickly and can make the cheese release moisture unevenly. To reheat, place individual portions or the whole pan in a 325°F oven until warmed through and lightly re-crisped on top. If making ahead, the syrup can be prepared in advance and kept refrigerated, and the assembled unbaked kunafa can be chilled briefly before baking, though the best texture comes from baking it fresh. Do not freeze fully syrup-soaked leftovers if texture is your priority, since the pastry can lose the delicate crisp-chewy contrast that defines a great homemade kunafa recipe. For the cleanest make-ahead plan, prep the syrup and pastry separately, assemble shortly before baking, and serve as fresh as possible for the best crunchy, cheesy result.
If you enjoyed this Crispy and Cheesy Kunafa or any other recipe on my blog,
please leave a ⭐ star rating and let me know how it went
in the comments below. I appreciate you taking time to read about this recipe, thank you!


Leave a Comment