Coconut Milk Chocolate Pots - These coconut milk chocolate pots set into a spoonable, silky dessert cup with a rich, cocoa-forward flavor and a smooth, velvety finish. The texture lands between pudding and ganache: thick enough to hold a clean scoop, yet creamy on the tongue with a glossy sheen. Dark chocolate brings deep bittersweet notes, while coconut milk adds a gentle sweetness that keeps the balance satisfying rather than heavy. This no bake chocolate dessert is make-ahead friendly, uses a short ingredient list, and chills into an elegant treat that feels perfect for entertaining.

Coconut Milk Chocolate Pots - This recipe works because it relies on fat balance and a controlled melt to create structure without whipping. After testing a “blend and chill” approach with only coconut milk and cocoa, the texture stayed thin and the flavor tasted flat, like chocolate milk rather than a dessert cup. The fix was technique over complexity: use full-fat coconut milk and enough dark chocolate to form a stable emulsion that firms as it cools. When you melt chocolate gently and whisk in warm coconut milk in stages, the mixture emulsify into a glossy base instead of splitting into oily streaks. Cocoa powder is optional but powerful; a small amount deepens the chocolate impression and makes the pots taste more intense without needing extra sweetener. I also found that sweetening lightly before chilling matters, because cold desserts taste less sweet after they set, and over-sweetening can bury the bittersweet chocolate finish. A pinch of salt is not decoration here—it sharpens cocoa and smooths bitterness so the flavor reads clean and restaurant-style. This shows how basic ingredients create something special: a can of coconut milk and a bar of chocolate turn into dairy free chocolate pots that look polished, hold their shape, and still feel easy. The method is straightforward but delivers professional results because the texture is built by a stable emulsion and a proper chill, not by complicated steps. This aligns with my focus on technique over complexity, where understanding fat, heat, and timing guarantees consistent, spoon-set chocolate pots that work for make ahead dessert cups, weeknight cravings, and last-minute guests.
Dietary Notes
- ✓ Dairy-Free Dessert Cups
- ✓ Minimal Ingredient Method
- ✓ Spoon-Set Texture
- ✓ Make-Ahead Friendly
♥
Why You'll Love This
- Elegant, Spoon-Set Finish: A stable coconut milk and chocolate emulsion chills into velvety, scoopable pots.
- No Oven Needed: Gentle melting and a quick whisk create a no bake chocolate dessert with minimal effort.
- Deep Chocolate Flavor: Dark chocolate and optional cocoa build a rich, cocoa-forward taste that feels satisfying.
- Flexible for Entertaining: Portion into cups, change toppings, and make ahead so serving is effortless.
Coconut Milk Chocolate Pots
👩🍳 Author: Abderrahmane
⏰ Prep Time: 15min
❄️ Cool Time: 240
🔥 Cook Time: 5min
🥨 Yield: 6
🍞 Method: No-Bake
🌾 Diet: Vegetarian
★
★
★
★
★
Leave a review
1x
2x
3x
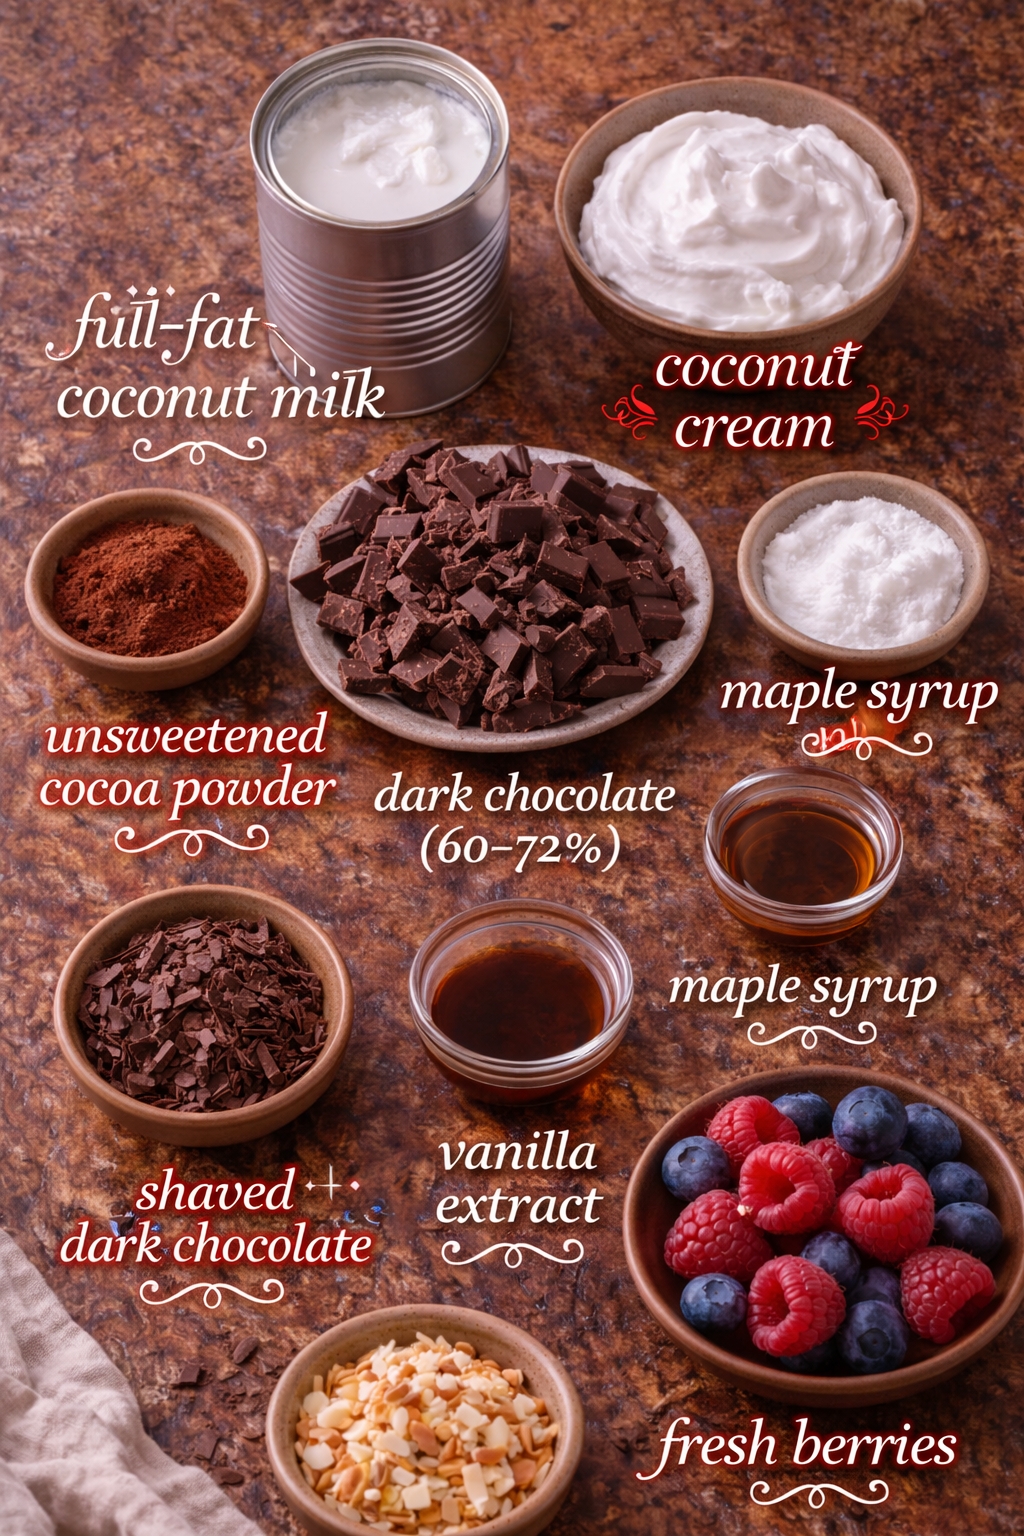
Ingredients
- 1 (13.5 oz) can full-fat coconut milk
- 1/2 cup coconut cream
- 6 oz dark chocolate, chopped (60–72%)
- 1 tbsp unsweetened cocoa powder
- 2 tbsp maple syrup
- 1 tsp vanilla extract
- 1/4 tsp fine sea salt
- 2 tbsp toasted coconut flakes
- 2 tbsp shaved dark chocolate
- 1 cup fresh berries
Ingredient Notes:
- full-fat coconut milk Use full-fat coconut milk for a creamy, velvety set; low-fat versions can turn thin and watery, which prevents a spoon-set texture in dessert cups.
- coconut cream Coconut cream boosts fat so the mixture chills firm and silky; it helps emulsify with chocolate for a stable, glossy finish that feels restaurant-style.
- dark chocolate, chopped (60–72%) Choose bar chocolate and chop it small so it melts evenly; a higher cocoa percentage builds flavor and helps the pots set tender and thick, not loose.
- unsweetened cocoa powder Whisk cocoa into warm coconut milk to hydrate it fully; this avoids dry, chalky notes and makes the chocolate taste deeper and more cocoa-forward.
- maple syrup Sweeten lightly and taste before chilling; cold desserts read less sweet, so this step guarantees balance without overpowering the bittersweet chocolate.
- vanilla extract Vanilla rounds the cocoa and makes the flavor feel complete; it supports a smooth, enjoyable finish without adding extra sweetness.
- fine sea salt A pinch of salt smooths bitterness and builds flavor; it is the quickest fix if the chocolate tastes harsh or flat after chilling.
- toasted coconut flakes Add toasted coconut right before serving so it stays crisp; it gives a crunchy contrast to the creamy pots and reinforces the coconut milk dessert vibe.
- shaved dark chocolate Shave chocolate from a bar for delicate curls; add at the end so it stays crisp and aromatic instead of melting into the surface.
- fresh berries Berries bring bright acidity that cuts richness; keep them dry and add at serving time to avoid watery topping that can dull the glossy set.
Instructions
-
1Step 1: Chop the dark chocolate finely and set it in a heatproof bowl - smaller pieces melt evenly so the base emulsify smoothly without scorching.
-
2Step 2: Warm the coconut milk and coconut cream in a small saucepan over medium-low heat until steaming and tiny bubbles appear at the edges - gentle heat prevents separation and keeps the texture creamy.
-
3Step 3: Whisk cocoa powder, maple syrup, vanilla, and salt into the warm coconut mixture until fully smooth - dissolving now prevents cocoa clumps and guarantees a glossy finish.
-
4Step 4: Pour the hot coconut mixture over the chopped chocolate and let it sit 60 seconds without stirring - resting melts the chocolate evenly for a silky base.
-
5Step 5: Whisk from the center outward until the mixture turns shiny and thick - this builds a stable emulsion so the pots set velvety, not oily.
-
6Step 6: Divide the chocolate mixture into 6 small cups and tap each cup gently to release air bubbles - a smooth surface looks clean and restaurant-style.
-
7Step 7: Chill for at least 4 hours until spoon-set and the center holds a clean scoop - chilling firms the fats and stabilizes the texture.
-
8Step 8: Top with toasted coconut, shaved chocolate, or berries right before serving - fresh toppings add crisp contrast and keep the dessert cups photo-ready.
Nutrition Facts
Calories 330
Protein 4g
Carbs 26g
Fiber 4g
Sugar 17g
Fat 26g
Sodium 140mg
Potassium N/A
Serving Suggestions
Portion the warm mixture into small glass cups or ramekins so you can see the glossy surface and the clean set after chilling. For the best presentation, chill uncovered for the first 20 minutes so steam escapes, then cover to prevent fridge odors. Serve cold for the most velvety texture, and add toppings right before serving so they stay crisp: a pinch of flaky salt, toasted coconut, shaved dark chocolate, or berries for a bright contrast. If you want a more dramatic look, add a small dollop of coconut whipped topping and a few curls of bar chocolate, and serve with espresso or mint tea for a balanced, not-too-sweet finish.
How to Store?
Store the chocolate pots covered in the refrigerator for up to 5 days; the texture stays stable and the flavor becomes even smoother as it rests. Serve straight from the fridge, or let the cups sit at room temperature for 5–8 minutes if you prefer a softer, more pudding-like spoon. Freezing is possible but can slightly dull the silky texture: if you freeze, wrap cups tightly and freeze up to 1 month, then thaw overnight in the fridge and stir gently only if needed. For make-ahead entertaining, portion into cups the day before, keep chilled, and add fresh toppings at the last moment so the surface stays glossy and the garnish stays crisp.
If you enjoyed this Coconut Milk Chocolate Pots or any other recipe on my blog,
please leave a ⭐ star rating and let me know how it went
in the comments below. I appreciate you taking time to read about this recipe, thank you!

Leave a Comment